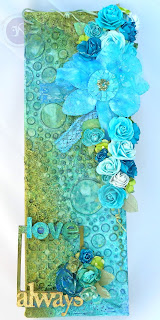
A quick hello and a grateful thank you for dropping by to check out my entry into this month's
Prima Product Picks Challenge.
The inspiration board that was posted on the Prima blog was:
My finished project based on the inspiration board looks like this:
While I did post some sneak peeks along the way on Instagram, like these:
Instagram Sneak Peek #1
Instagram Sneak Peek #2
Instagram Sneak Peek #3
Here is a summary tutorial with more detail on what I used and how it all came together. :)
 |
Products:
- Creative Embellishments chipboard pieces
- Other chipboard pieces (unknown source)
- Golden Arts Light Molding Paste
- Golden Arts Seed Bead Gel
- "Generic" brand white gesso
Process:
- Cut apart and glue down chipboard pieces to canvas
- Paint with a couple coats of gesso
- Stipple on molding paste to create small peaks
- Add seed bead gel as desired
- Paint with another couple coats of gesso
|
 |
Products:
- Prima Finnabair stencil
- Prima color bloom sprays
- Liquitex Modelling Paste (not pictured)
- Many other sprays, at least 3 others (not pictured)
Process:
- Use modelling paste with the stencil to create more
background texture
- Spray with shimmery colour sprays until desired
colouring is achieved. :)
|
 |
Products:
- Prima floral vine
- Prima large flower
- Prima small flowers
- Liquitex clear gesso (not pictured)
- Get it? It's clear gesso. :P
- Other random flowers (source unknown)
- Stickles (not pictured)
- Wooden polaroid frame (source unknown)
- Lettering (multiple sources)
Process:
- Add Prima vine
- Add Prima large flower
- Add Prima small flowers
- Add chipboard pieces to the back of the wooden
polaroid frame to add dimension
- Use clear gesso on polaroid frame
- Use all the same sprays and stickles on the frame
- Adhere frame to the canvas :)
- Add lettering as desired
- Add all the other embellishments your heart desires
|
 |
| No filter - This is genuinely how bright the canvas is while hanging on my fence. :) |
 |
| I clustered my flowers along the side of the canvas as well. :) |
 |
| A close-up of the cluster |
 |
| A close-up of the frame area |
More photos because I love this project and felt a different background could help some people, maybe? :)
HOLY PHOTOS!
If you have any questions, feel free to ask away! :)
Thanks so very much for stopping by!!!
Krafty Kerry signing off!


