Monday, 21 September 2015
Trying to Get Started with Christmas Cards
OK - I know the thought of Christmas for some is completely unacceptable, but I am trying to get myself ready for the season. :)
In saying that, I have created a couple cards based on the Freshly Made Sketches, Sketch #204.
I actually really liked this sketch, because my mojo was lacking pretty hard... But this simple sketch allowed me a starting point to whip something up relatively easily. :) I actually ended up making a few different cards with the same sketch, using Graphic 45's 12 days of Christmas collection.
Thanks so much for stopping by!
Krafty Kerry signing off!
Thursday, 13 August 2015
Long Time No See, Welcome to my August Prima PPP Entry! (Lots of Pics!)
A quick hello and a grateful thank you for dropping by to check out my entry into this month's Prima Product Picks Challenge.
The inspiration board that was posted on the Prima blog was:
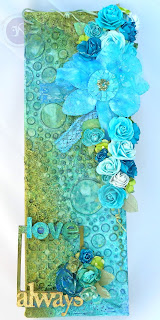
My finished project based on the inspiration board looks like this:
While I did post some sneak peeks along the way on Instagram, like these:
Instagram Sneak Peek #1
Instagram Sneak Peek #2
Instagram Sneak Peek #3
Here is a summary tutorial with more detail on what I used and how it all came together. :)
More photos because I love this project and felt a different background could help some people, maybe? :)
HOLY PHOTOS!
If you have any questions, feel free to ask away! :)
Thanks so very much for stopping by!!!
Krafty Kerry signing off!
The inspiration board that was posted on the Prima blog was:
While I did post some sneak peeks along the way on Instagram, like these:
Instagram Sneak Peek #1
Instagram Sneak Peek #2
Instagram Sneak Peek #3
Here is a summary tutorial with more detail on what I used and how it all came together. :)
 |
| No filter - This is genuinely how bright the canvas is while hanging on my fence. :) |
 |
| I clustered my flowers along the side of the canvas as well. :) |
 |
| A close-up of the cluster |
 |
| A close-up of the frame area |
More photos because I love this project and felt a different background could help some people, maybe? :)
HOLY PHOTOS!
If you have any questions, feel free to ask away! :)
Thanks so very much for stopping by!!!
Krafty Kerry signing off!


